한빛미디어의 <밑바닥부터 시작하는 딥러닝 2>를 요약 정리한 글이다.
언어 모델은 지금까지 주어진 단어를 바탕으로 다음에 출현할 단어의 확률분포를 출력한다.
문장 생성은 이 확률분포에서 다음 단어를 선택하고, 선택된 단어를 다시 모델에 입력으로 넣는 과정을 반복하는 방식이다.
이 과정을 특정 길이에 도달할 때까지 반복하거나, <eos> 같은 종료 토큰이 나올 때까지 반복하면 하나의 문장을 생성할 수 있다.
문장 생성의 기본 흐름
언어 모델이 어떤 단어를 입력받으면 다음 단어 후보들에 대한 확률분포를 출력한다.
다음 단어를 선택하는 방법은 크게 두 가지이다.
- 확률이 가장 높은 단어를 선택한다.
- 확률분포에 따라 확률적으로 단어를 샘플링한다.
첫 번째 방법은 항상 같은 입력에 대해 같은 단어를 선택하는 결정적 방법이다.
두 번째 방법은 확률이 높은 단어가 선택될 가능성은 높지만, 매번 같은 단어가 선택되지는 않는 확률적 방법이다.
문장 생성에서는 보통 두 번째 방법을 사용한다.
이렇게 하면 같은 시작 단어를 주어도 매번 조금씩 다른 문장을 생성할 수 있다.
전체 과정은 다음과 같다.
start word
→ language model
→ probability distribution
→ sample next word
→ feed sampled word again
→ repeat
이때 생성된 문장은 훈련 데이터에 그대로 존재하는 문장이 아니라, 훈련 데이터에서 학습한 단어 배열 패턴을 바탕으로 새롭게 생성된 문장이다.
RNNLM을 이용한 문장 생성
RNN 언어 모델로 문장을 생성하는 클래스는 기존 Rnnlm을 상속해 만들 수 있다.
class RnnlmGen(Rnnlm):
    def generate(self, start_id, skip_ids=None, sample_size=100):
        word_ids = [start_id]

        x = start_id
        while len(word_ids) < sample_size:
            x = np.array(x).reshape(1, 1)
            score = self.predict(x)
            p = softmax(score.flatten())

            sampled_id = int(np.random.choice(len(p), size=1, p=p))
            if (skip_ids is None) or (sampled_id not in skip_ids):
                x = sampled_id
                word_ids.append(sampled_id)

return word_idsstart_id는 문장 생성을 시작할 단어 ID이다.
모델은 입력 단어를 바탕으로 다음 단어에 대한 score를 출력하고, 이 score를 softmax로 확률분포로 바꾼다.
그다음 np.random.choice를 사용해 확률분포 에 따라 다음 단어 ID를 샘플링한다.
샘플링된 단어 ID는 다시 다음 시점의 입력으로 사용된다.
이 과정을 sample_size만큼 반복하면 단어 ID 목록이 만들어진다.
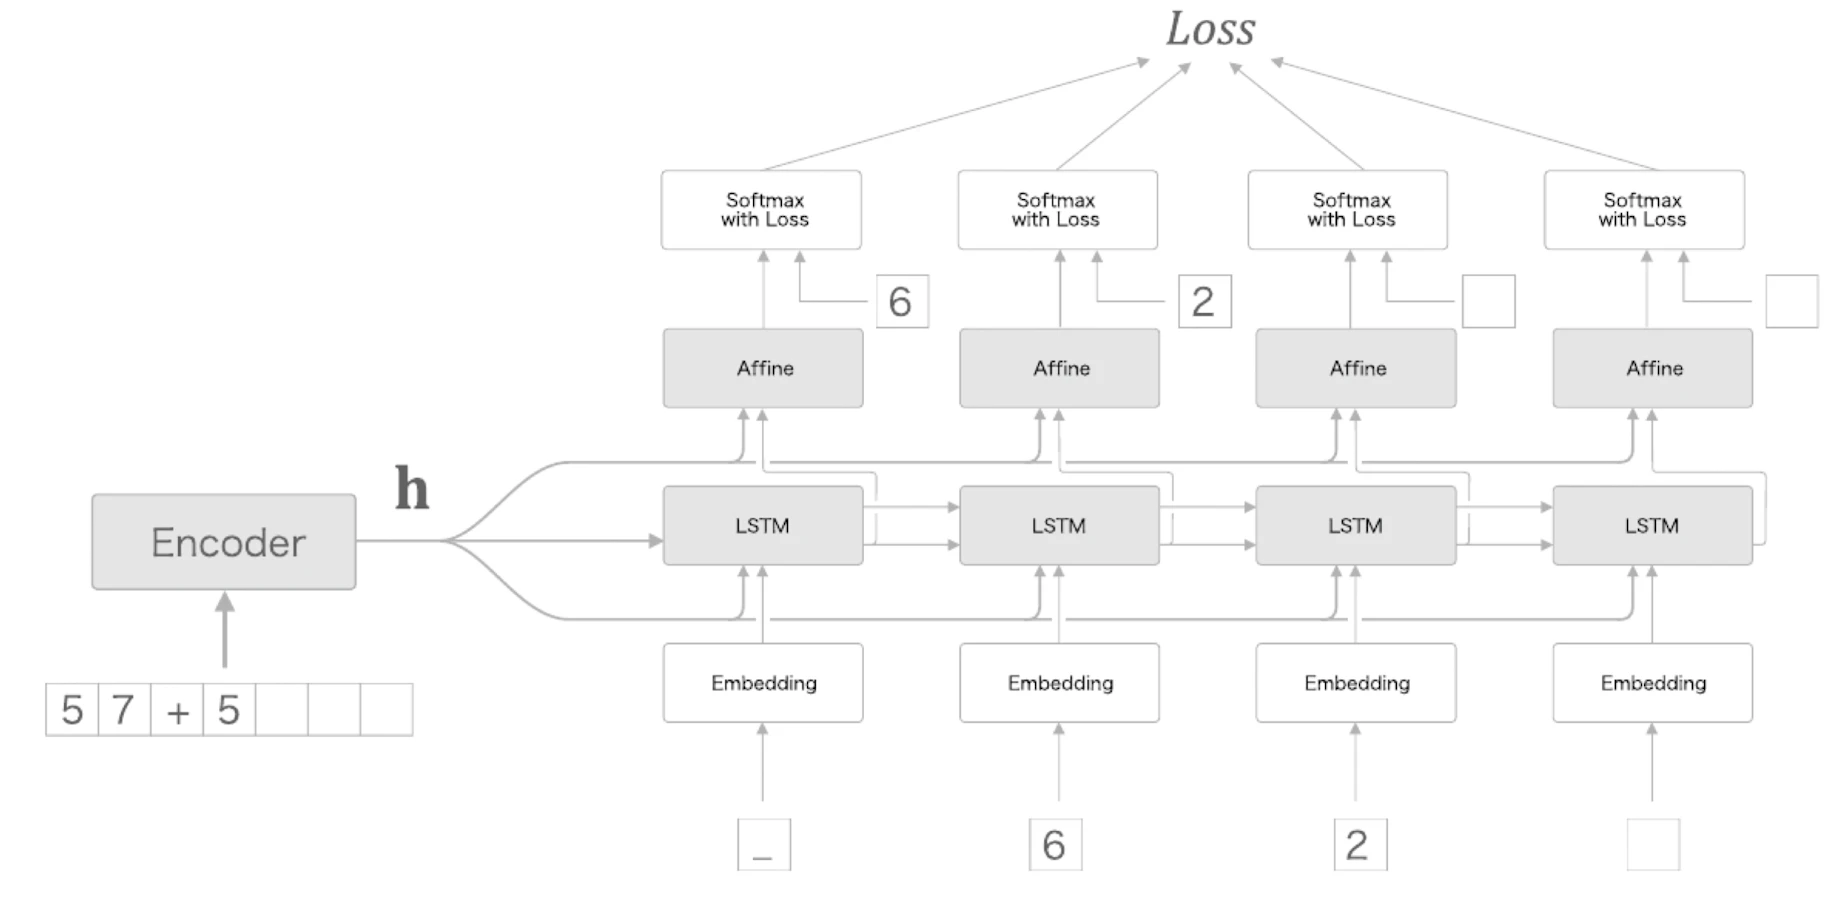
Seq2seq
Seq2seq는 시계열 데이터를 다른 시계열 데이터로 변환하는 모델이다.
Encoder-Decoder model이라고도 부른다.
대표적인 예시는 기계 번역이다.
입력 문장: 나는 고양이다.
→ Encoder
→ Decoder
출력 문장: I am a cat.
Encoder는 입력 문장을 고정 길이 벡터로 변환한다.
Decoder는 이 벡터를 바탕으로 출력 문장을 생성한다.
즉, Encoder가 만든 은닉 벡터 에는 출력 문장을 생성하는 데 필요한 정보가 압축되어 있다.
Encoder
Encoder는 입력 시계열 데이터를 하나의 벡터 로 변환한다.
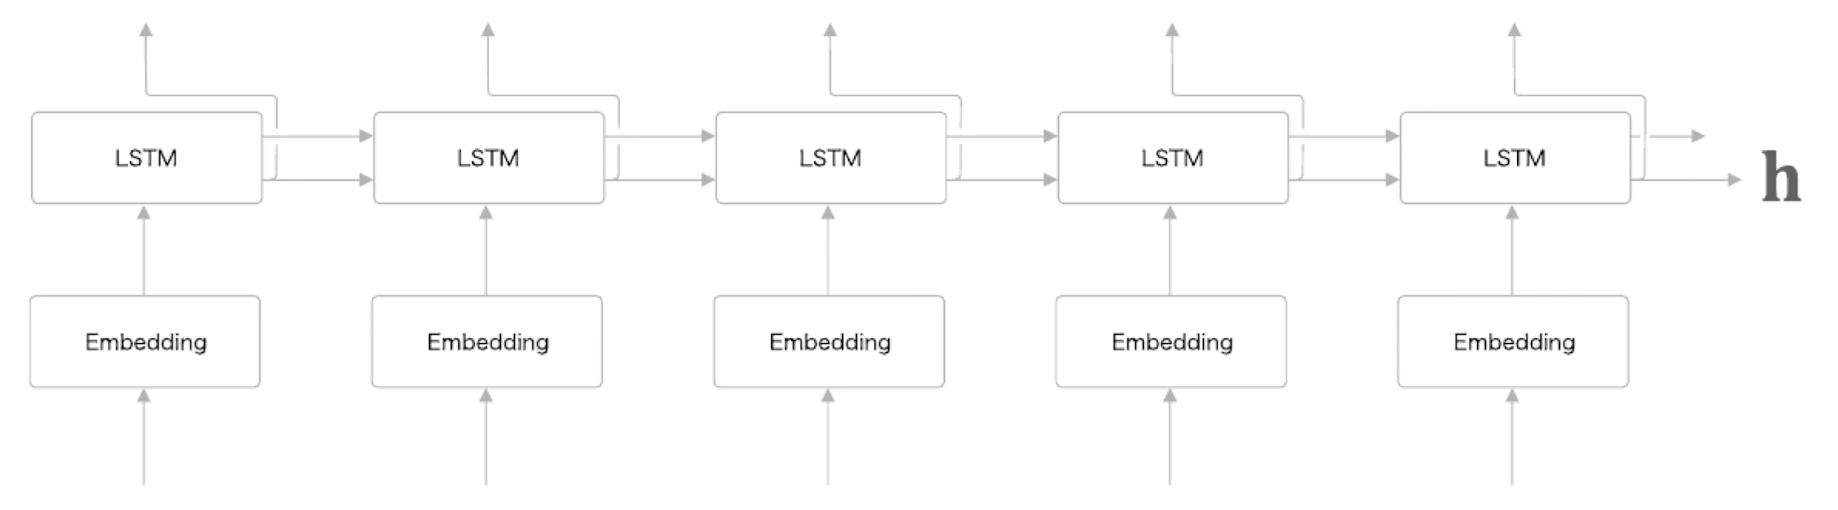
Encoder는 보통 Embedding 계층과 LSTM 계층으로 구성된다.
class Encoder:
    def __init__(self, vocab_size, wordvec_size, hidden_size):
        V, D, H = vocab_size, wordvec_size, hidden_size
        rn = np.random.randn

        embed_W = (rn(V, D) / 100).astype('f')
        lstm_Wx = (rn(D, 4 * H) / np.sqrt(D)).astype('f')
        lstm_Wh = (rn(H, 4 * H) / np.sqrt(H)).astype('f')
        lstm_b = np.zeros(4 * H).astype('f')

        self.embed = TimeEmbedding(embed_W)
        self.lstm = TimeLSTM(lstm_Wx, lstm_Wh, lstm_b, stateful=False)

        self.params = self.embed.params + self.lstm.params
        self.grads = self.embed.grads + self.lstm.grads
        self.hs = None
Encoder는 여러 입력 문장을 독립적으로 처리해야 하므로 stateful=False로 둔다.
각 입력 문장 사이에서 은닉 상태가 이어지면 안 되기 때문이다.
순전파는 다음과 같다.
def forward(self, xs):
    xs = self.embed.forward(xs)
    hs = self.lstm.forward(xs)
    self.hs = hs
    return hs[:, -1, :]
LSTM은 입력 시퀀스를 순서대로 읽으면서 은닉 상태를 갱신한다.
마지막 은닉 상태 는 입력 시퀀스 전체를 요약한 벡터로 볼 수 있다.
따라서 Encoder는 hs[:, -1, :], 즉 마지막 시점의 은닉 상태를 Decoder로 전달한다.
역전파에서는 Decoder가 전달한 gradient가 마지막 은닉 상태에만 들어온다.
def backward(self, dh):
    dhs = np.zeros_like(self.hs)
    dhs[:, -1, :] = dh

    dout = self.lstm.backward(dhs)
    dout = self.embed.backward(dout)
    return dout
Decoder
Decoder는 Encoder가 만든 은닉 벡터 를 초기 상태로 받아 출력 시퀀스를 생성한다.

<eos>는 문장 시작과 종료를 나타내는 구분자로 사용할 수 있다.
Decoder는 아무 입력도 없는 상태에서 바로 문장을 만들 수 없으므로, 생성 시작을 알리는 토큰이 필요하다.
예를 들어 다음과 같이 동작한다.
input:  <eos> → output: I
input:  I     → output: am
input:  am    → output: a
input:  a     → output: cat
input:  cat   → output: <eos>
학습 시에는 정답 출력 문장을 알고 있으므로, Decoder에 정답 토큰들을 한 번에 입력할 수 있다.
이 방식을 teacher forcing이라고 한다.
추론 시에는 시작 토큰 하나만 주고, Decoder가 출력한 토큰을 다시 다음 입력으로 넣는다.

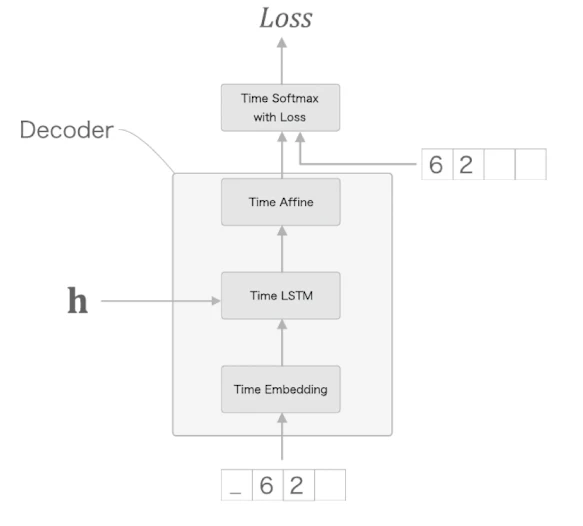
Decoder 클래스는 다음과 같다.
class Decoder:
    def __init__(self, vocab_size, wordvec_size, hidden_size):
        V, D, H = vocab_size, wordvec_size, hidden_size
        rn = np.random.randn

        embed_W = (rn(V, D) / 100).astype('f')
        lstm_Wx = (rn(D, 4 * H) / np.sqrt(D)).astype('f')
        lstm_Wh = (rn(H, 4 * H) / np.sqrt(H)).astype('f')
        lstm_b = np.zeros(4 * H).astype('f')
        affine_W = (rn(H, V) / np.sqrt(H)).astype('f')
        affine_b = np.zeros(V).astype('f')

        self.embed = TimeEmbedding(embed_W)
        self.lstm = TimeLSTM(lstm_Wx, lstm_Wh, lstm_b, stateful=True)
        self.affine = TimeAffine(affine_W, affine_b)

        self.params, self.grads = [], []
        for layer in (self.embed, self.lstm, self.affine):
            self.params += layer.params
            self.grads += layer.grads
순전파에서는 Encoder에서 받은 를 LSTM의 초기 상태로 설정한다.
def forward(self, xs, h):
    self.lstm.set_state(h)

    out = self.embed.forward(xs)
    out = self.lstm.forward(out)
    score = self.affine.forward(out)
    return score
역전파에서는 TimeSoftmaxWithLoss에서 받은 gradient를 Affine → LSTM → Embedding 순서로 전달한다.
def backward(self, dscore):
    dout = self.affine.backward(dscore)
    dout = self.lstm.backward(dout)
    dout = self.embed.backward(dout)
    dh = self.lstm.dh
    return dh
여기서 dh는 Encoder의 마지막 은닉 상태 로 되돌아가는 gradient이다.
문장 생성 시에는 generate()를 사용한다.
def generate(self, h, start_id, sample_size):
    sampled = []
    sample_id = start_id
    self.lstm.set_state(h)

    for _ in range(sample_size):
        x = np.array(sample_id).reshape((1, 1))
        out = self.embed.forward(x)
        out = self.lstm.forward(out)
        score = self.affine.forward(out)

        sample_id = np.argmax(score.flatten())
        sampled.append(int(sample_id))

    return sampled
이 예시에서는 가장 높은 score를 가진 토큰을 선택하기 위해 argmax를 사용한다.
softmax는 대소관계를 바꾸지 않으므로, 가장 큰 score를 고르는 목적이라면 softmax를 생략할 수 있다.
Seq2seq 구현
Seq2seq는 Encoder, Decoder, TimeSoftmaxWithLoss로 구성된다.
class Seq2seq(BaseModel):
    def __init__(self, vocab_size, wordvec_size, hidden_size):
        V, D, H = vocab_size, wordvec_size, hidden_size
        self.encoder = Encoder(V, D, H)
        self.decoder = Decoder(V, D, H)
        self.softmax = TimeSoftmaxWithLoss()

        self.params = self.encoder.params + self.decoder.params
        self.grads = self.encoder.grads + self.decoder.grads
순전파에서는 먼저 Encoder가 입력 문장 xs를 벡터 로 변환한다.
그다음 Decoder가 와 decoder 입력을 이용해 출력 score를 만든다.
def forward(self, xs, ts):
    decoder_xs, decoder_ts = ts[:, :-1], ts[:, 1:]

    h = self.encoder.forward(xs)
    score = self.decoder.forward(decoder_xs, h)
    loss = self.softmax.forward(score, decoder_ts)
    return loss
정답 시퀀스 ts는 한 칸 밀어서 사용한다.
decoder_xs = ts[:, :-1]
decoder_ts = ts[:, 1:]
즉, Decoder는 이전 토큰을 입력으로 받아 다음 토큰을 맞히도록 학습한다.
역전파에서는 Decoder에서 나온 에 대한 gradient를 Encoder로 넘긴다.
def backward(self, dout=1):
    dout = self.softmax.backward(dout)
    dh = self.decoder.backward(dout)
    dout = self.encoder.backward(dh)
    return dout
문장 생성은 다음과 같다.
def generate(self, xs, start_id, sample_size):
    h = self.encoder.forward(xs)
    sampled = self.decoder.generate(h, start_id, sample_size)
    return sampled
Encoder가 입력 문장을 로 변환하고, Decoder가 이 를 기반으로 토큰을 하나씩 생성한다.
Seq2seq 개선: 입력 반전
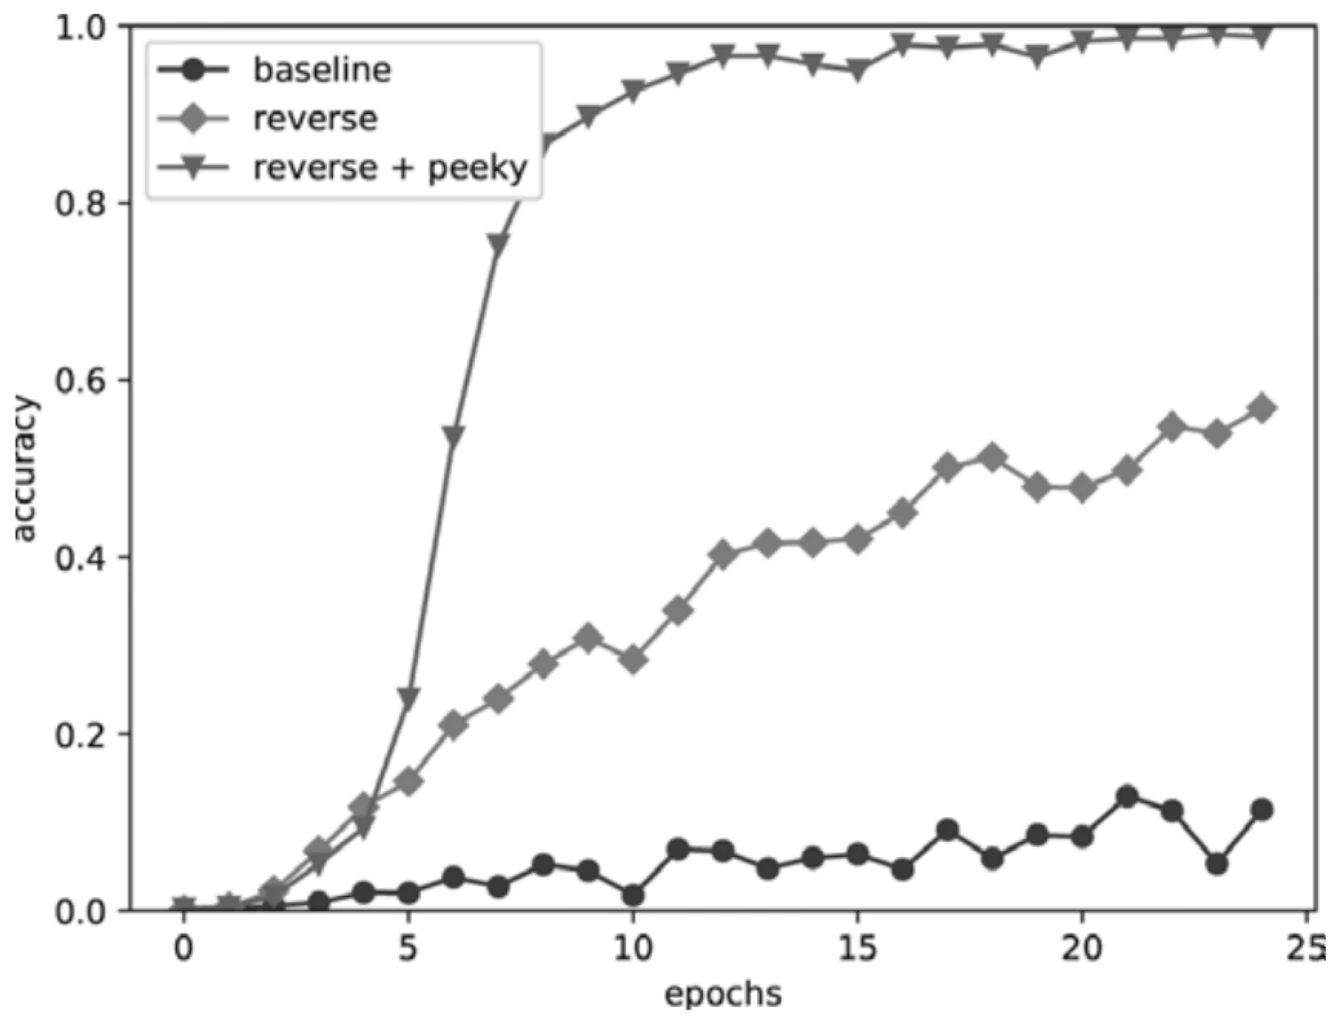
Seq2seq에서는 입력 문장을 뒤집어 넣는 것만으로도 성능이 개선될 수 있다.
x_train = x_train[:, ::-1]
x_test = x_test[:, ::-1]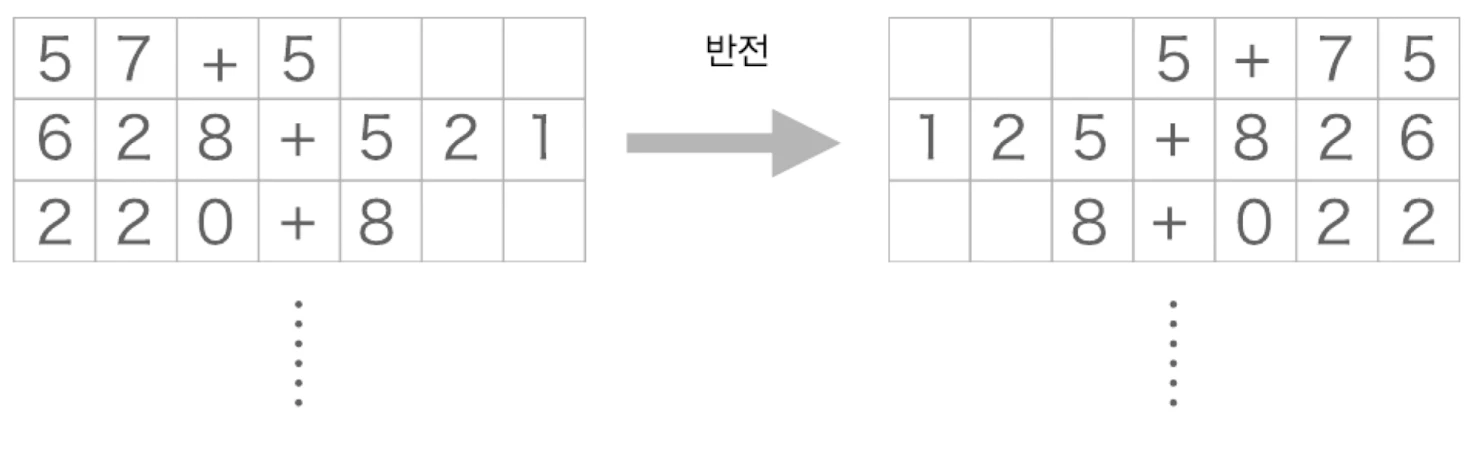
입력 반전의 핵심은 장기 의존 경로를 짧게 만드는 것이다.
일반적인 seq2seq에서는 입력 시퀀스가 다음과 같이 들어간다.
x1, x2, ..., xnEncoder는 마지막 토큰까지 읽은 뒤 을 Decoder에 전달한다.
그런데 Decoder가 처음 생성해야 하는 출력 이 입력 앞쪽 과 강하게 관련되어 있다면, 의 정보는 긴 경로를 지나야 한다.
x1 → x2 → ... → xn → h_n → y1입력을 뒤집으면 다음과 같다.
xn, ..., x2, x1이 경우 은 Encoder의 마지막에 가까워지고, Decoder 초반 출력과의 거리도 짧아진다.
따라서 역전파가 더 잘 흐르고 학습이 쉬워질 수 있다.
현대적인 Transformer 구조에서는 attention이 모든 위치를 직접 참조할 수 있으므로 이런 입력 반전 기법의 의미가 줄어든다.
하지만 RNN 기반 seq2seq에서는 입력 반전이 장기 의존성 문제를 완화하는 간단한 방법이다.
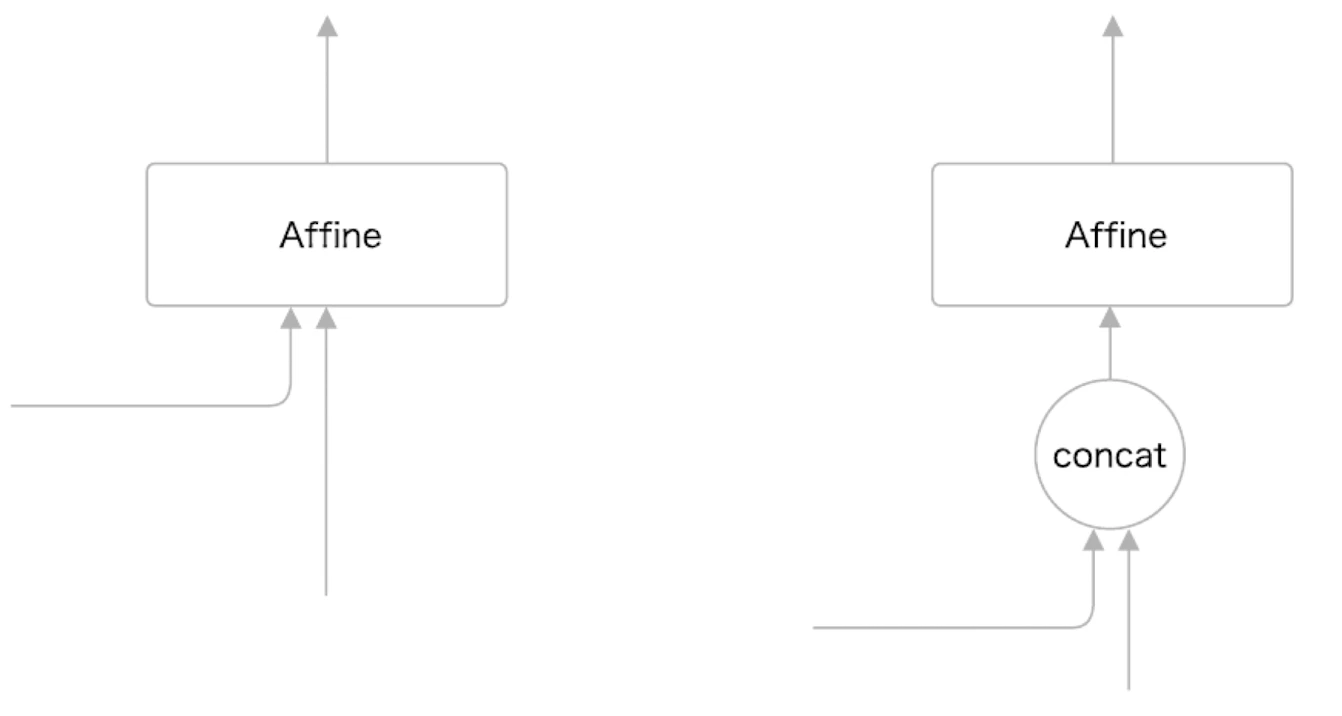
Peeky
기본 seq2seq에서는 Encoder의 마지막 은닉 벡터 가 Decoder의 초기 은닉 상태로만 전달된다.
Peeky 구조는 이 중요한 벡터 를 Decoder의 다른 계층에도 직접 전달한다.
즉, Decoder가 매 시점마다 Encoder의 문장 표현 를 직접 볼 수 있게 한다.
구현상으로는 를 각 시점만큼 복제한 뒤, 기존 입력과 concat한다.
Peeky Decoder의 순전파는 다음과 같다.
def forward(self, xs, h):
    N, T = xs.shape
    N, H = h.shape

    self.lstm.set_state(h)

    out = self.embed.forward(xs)
    hs = np.repeat(h, T, axis=0).reshape(N, T, H)

    out = np.concatenate((hs, out), axis=2)
    out = self.lstm.forward(out)

    out = np.concatenate((hs, out), axis=2)
    score = self.affine.forward(out)
    self.cache = H
    return score
먼저 를 시계열 길이 만큼 복제한다.
hs = np.repeat(h, T, axis=0).reshape(N, T, H)이렇게 하면 hs의 형상은 다음과 같다.
이제 임베딩 출력과 hs를 마지막 축 방향으로 붙인다.
out = np.concatenate((hs, out), axis=2)임베딩 출력의 형상이 라면 concat 이후 형상은 다음과 같다.
LSTM 출력 후에도 다시 를 붙인다.
out = np.concatenate((hs, out), axis=2)LSTM 출력의 형상이 라면 concat 이후 형상은 다음과 같다.
마지막으로 Affine 계층이 이를 vocabulary 크기의 score로 변환한다.
정리
RNN 언어 모델은 다음 단어 확률분포에서 단어를 샘플링하고, 샘플링된 단어를 다시 입력으로 넣는 과정을 반복하여 문장을 생성한다.
Seq2seq는 Encoder가 입력 시퀀스를 고정 길이 벡터로 변환하고, Decoder가 그 벡터를 바탕으로 출력 시퀀스를 생성하는 구조이다.
학습 시에는 teacher forcing을 사용해 정답 시퀀스를 한 칸 밀어 Decoder 입력과 정답으로 사용한다.
추론 시에는 시작 토큰만 주고, Decoder가 생성한 토큰을 다음 입력으로 사용한다.
입력 반전은 RNN 기반 seq2seq에서 장기 의존 경로를 줄이는 간단한 개선 방법이다.
Peeky 구조는 Encoder의 은닉 벡터 를 Decoder의 여러 계층에 직접 전달하여, Decoder가 입력 문장 정보를 더 자주 참조할 수 있게 만든다.